This is an animation I have recently seen, I was very impressed by it. The animation is called 'our new world'. Took the animator over two years to create/animate. When I first saw it I thought it was created with Maya. But, the creator said it was created on Blender 3D programme. Here is a link from the creator, who's explains about the animation more on how he create the animation.
My thoughts on the animation, I felt that the narrative worked really well with the animation. Also, I felt the use of black and white colours and then adding red to animation made it more like something out of a Frank Miller's Sin City comic book styling to the animation. But, overall I enjoyed the animation, very cleaver animation in my opinion the creator has created.
That is all. Bye.
Sunday, 27 May 2012
Wednesday, 14 March 2012
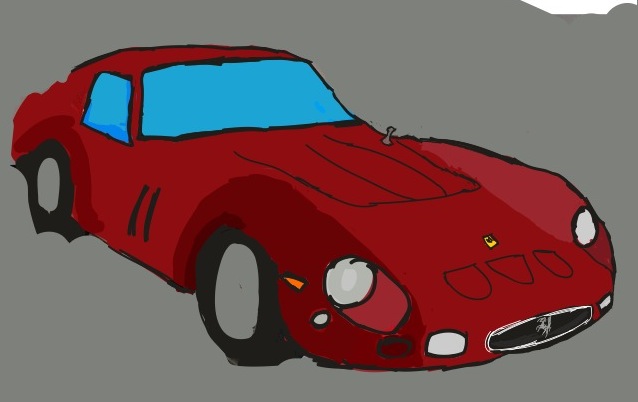
GTO art cars from Adobe Ideas I've created
Second post/blog of March. This what I have done from last few months ago on my iPod touch. Influenced by a few images from the Superman/Batman comic books. Draw them first by hand, then scanned in, then altered in Photoshop.

There was an app for free on iTunes called Adobe Ideas for the iPhone (now cost £2.99 for the app nowadays) which I've done some drawings perviously I've done on my iPod Touch.

I was Influenced by the image of the Ferrari 250 GTO to created it in Adobe Ideas.

I started with the image behind as a template, draw in the basic colours onto another layer.

Then I remove/hide the real image reappear as a reference on in a while. Then add more colour to the main image.

Then re-tidy the details/adding and removing colour of the car with a bit of trail and error. Some didn't work. But, is developing the piece.

Add some details to the bonnet.

Add some more detail, add/replace colour.

Add the Ferrari logo on the side of the car.

Then retouch the front end of he car again for the finish piece of the 250 GTO.
Then I done this with the Ferrari 288 GTO.

And the Ferrari 599 GTO too.

So I take all three GTO cars into Photoshop for a little altering on angles of the cars. Saved as as a jpg file. So here is the finish product of Ferrari GTOs' below.

That is all. Bye.

There was an app for free on iTunes called Adobe Ideas for the iPhone (now cost £2.99 for the app nowadays) which I've done some drawings perviously I've done on my iPod Touch.

I was Influenced by the image of the Ferrari 250 GTO to created it in Adobe Ideas.

I started with the image behind as a template, draw in the basic colours onto another layer.

Then I remove/hide the real image reappear as a reference on in a while. Then add more colour to the main image.

Then re-tidy the details/adding and removing colour of the car with a bit of trail and error. Some didn't work. But, is developing the piece.

Add some details to the bonnet.
Add some more detail, add/replace colour.

Add the Ferrari logo on the side of the car.

Then retouch the front end of he car again for the finish piece of the 250 GTO.
Then I done this with the Ferrari 288 GTO.

And the Ferrari 599 GTO too.

So I take all three GTO cars into Photoshop for a little altering on angles of the cars. Saved as as a jpg file. So here is the finish product of Ferrari GTOs' below.

That is all. Bye.
Sunday, 4 March 2012
A drawing/illustrated post with super heroes in it
First proper post/blog of March. Starting of with a different post today. This what I have done from last few months. Influenced by a few images from the Superman/Batman comic books. Draw them first by hand, then scanned in, then altered in Photoshop.

I was influenced by the Pop Art movement, Artist such as Roy Liechtenstein and Andy Warhol. Also, I was influenced by Frank Miller’s Sin City Comic book style of black and white images with adding limited colour.
The original drawings was created by using HB pencil and a sharpie pen.

Then adding the blue and red by using cheap marker pens to draw in.

Now, I went into Photoshop by scanning in the original black and white image. Then in Photoshop I threshold the image to black and white. Then, with the layer went to select menu – click onto colour range, put the fuzziness to 100% clicked OK then delete the white bits of the image as the image below shows.

Then in a few layers below the main layer added simple colours to the image in each layer.

After I added the colour, then saved as a jpg file. This is the finish piece.

Also, I’ve did the same technique to Batman image as-well as Superman above.


So here is the finish product of Superman and Batman together.
That is all. Bye.
Saturday, 14 January 2012
This is for anyone if you got any kind of 3D glasses, you have got to try this out
First proper post/blog of 2012. Starting of with something completely different. This what I have done in my down time since Christmas a 3D image creating from Photoshop.

I was very influence by an image which was created by friend below on some dolls from the Playsation 3 game 'Little Big Planet'.

So I was Influenced by this, so I want to a few web-sites to find some tutorials, this link next to me was the best tutorial for this exercise: http://www.photoshoplady.com/tutorial/apply-3d-effect-on-movie-poster/3654

First I created this imaage. Inspired by a racing car livery on another car. The original photo was taken in a market town in Essex. Then the image was imported into Adobe Photoshop and then traced and improved by using different filters, layers and techniques to create the image above.
Afterwards, gone onto this web-site:http://www.photoshoplady.com/tutorial/apply-3d-effect-on-movie-poster/3654 to create the image below, it took a few times in Photoshop to understand the tutorial. I felt this tutorial would work better with a real photo, rather than something was created in Photoshop, in my opinion. So enjoy the image folks.
End of blog for now. New post soon. That is all, Bye.
Friday, 30 December 2011
The Forth and final blog for Red Bull Canimation Challenge
Hi again, final post for this project, and the final animation as-well. So here's the conclusion of the animation and the results afterwards.
Day 17: 9/10/11
Today I have finished off the Formula 1 Red Bull race scene, which is all completed, with a few tweaks for the F1 Red Bull race scene.

Day 18: 10/11/11
Today I finished the scene were Mark meets Sebastian (see Day 14:6/11/11). Now which includes both bodies into the animation, which is now completed.

Day 19: 11/11/11
Today I done the background of the garage and the mechanics who are in the pit lane , the mechanics were created by a movie clip symbol, drawing in the movie-clip symbol when they need to blink.

While the garages are created as a graphic symbol simply to create this.

Day 20: 12/11/11
I done today the body movement at the end of the animation were Sebastian does his signature winning pose (picture below explains clearer what I'm explaining).

Done this a the same as when Sebastian saying hello to the audience (Day 12 4/11/11) inside a movie-clip symbol. Then afterwards placing it into the main timeline to create this.

I added a new camera tracking into Sebastian by using two different keyframes then connecting with a motion tween in each layer that was needed with.
This is the animation so far.
Day 21: 13/11/11
I've re-edited the audio for the animation to add another character speaking. Also, I changed the background music too in GarageBand, re-ring it into Flash on the main timeline.

Day 22: 14/11/11
Today I've completed the animation altogether such as the outro adding a certain product into the animation as-well.

After I done this I've exported the animation by file - export - export movie. I checked all exporting set up such as size of the animation, compressor which is an animation compression, and frame rate (25fps- frames per second) so the animation matches with the audio. Then press export button as a QuickTime file.


After it was exported, I checked the QuickTime was fine, nothing gone wrong what I watched. When everything was fine I've uploaded the QuickTime file onto YouTube and Vimeo to show everyone around the world, anyone who is interested in my work. Ready to be hand in for the competition.
Day 23: 15/11/11
Today I have entered the animation on the Canimation web-site signed up for the competition. I've also Tweeted and Face-booked as many people as possible to watch the animation and like it on Facebook so I have a change of winning the open competition in the drawn category.

Therefore, I have done the best what I can promote the animation through out the week.
The Result
Bad news, didn't won the open drawn category, let alone in the top 10. So Game Over for now. However got some feedback of liking the animation I created.
The Winning animation in my group was called 'SkyHound' in the open drawn category. I liked the animation. But, its a big but, I felt the animation was more CGI (After Effects maybe even a 3D program) than hand drawn in my opinion. I felt there is other animations had a more drawn quality then this animation what I have seen. This is more of the Judges have picked in their opinion so well done for winning. If you think I am a sore loser I am not, just saying. Anyway, end of Project/Challenge.
But, for now see you in 2012. Bye.
Sunday, 25 December 2011
Happy Xmas guys
First there will be another post in 2011, finishing off Canimation project. For now Happy Christmas/happy holidays, see you in 2012. That's all Bye.
Wednesday, 7 December 2011
Third blog for Red Bull Canimation Challenge
Hi again, the continue of the animating side of the animation so far. So here is the continuation of the blog from last time out.
Day 12: 4/11/11
Today I began to start on the animation proper. I started with the Looney Tunes titles by creating a shape tween to create this. Also, I used throughout the aniamtion motion tweens. For example "once a upon a time" text went off in the left of the screen by creating a motion tween to do this by selecting which frame I want in the time line.

Also, I done today the body movement when Sebastian says hello to the audience. Such as waving/ being happy to the audience done this inside a movie-clip symbol. Then afterwards placing it into the main timeline to create this.


Day 13: 5/11/11
Today I done the first of the two race scene, this was done by using motion tweens for the background constantly (also created the grandstands, fence to create a F1 race weekend scene). Also, with the race cars overtaking. I've also done was to depurating the race cars, for example changing the race car lively as-well, so you were Sebastian is in the animation.


Day 14: 6/11/11
Today I started basically (head with a skeleton body) were Mark meets Sebastian scene. Done this as the same technique as we first seen Sebastian for the first time (Day 12: 6/11/11) waving/ being happy to each other. Then afterwards placing it into the main timeline to create this.

Also, I done today, Mark crash helmets and face expressions too.

This is the animation so far.
Day 15: 7/11/11
Today in Adobe Flash, I created a movie clip symbol of where I am going to add tyres moving for the main Formula 1 car. However, I had problems were the tyres I was going to use didn't rotate right when testing this in Flash.

So therefore, I have replace with toy wheels instead, which worked well aesthetically and rotated much better then the previous tyres.


Also, I did today a Red Bull can into the animation, same techniques I did with the can-race car and the Formula 1 car (Day 9), so you will see a Red Bull product in the animation, which was a requirement.

Day 16: 8/11/11
Today, I did a Formula 1 car on the top of the world, where it would be a billboard. As the Narrator saying "Red Bull are winning around the world" you will see it in the background of my animation. I did this by bringing a png file of the Planet Earth into Flash.

Then in a new movie-clip symbol place the planet earth on a layer, then rotate using a motion tween. Afterwards, put onto another layer a movie clip of a Formula 1 car with its wheels rotating to create this scene.


This is the animation so far.
End of post for now, new post soon. Bye.
Subscribe to:
Posts (Atom)